Notes on baking with live yeast
Being unable to go to the workshop during much of the pandemic, I still wanted to make things, so I turned my attention to something easier to work on at home: baking. Like with woodwork, there’s lots to learn if you choose to dig into any particular aspect, you can refine your craft, and you get something nice at the end of it all. This post is just documenting some of the bits I’ve learned with experimenting with fresh yeast.
I’d never been that happy with home-made bread until I switched to using live yeast. Try as I might, the stuff I made with packet yeast always tasted somewhat of packet yeast, regardless of whether I made it by hand or I used our breadmaker. It was a game changer when, a couple of years ago, Laura got me some Kronjäst from Scandi Kitchen, live yeast that comes in 50g packets made by a Swedish company, and that gave me bread that I was much happier with taste-wise. 50g is enough for 4 loaves, and if you seal it up it’ll last a few weeks in the fridge. You can also freeze the cubes, so you can stock up, but once you de-freeze it the yeast cubes do tend to go a bit squidgy and don’t keep so long, so you’ll want to use them quicker, or you can pre-divide them before freezing so you just get the right amount. I just take a unit out the freezer and move it to the fridge the day before I want it and it’s ready to go.
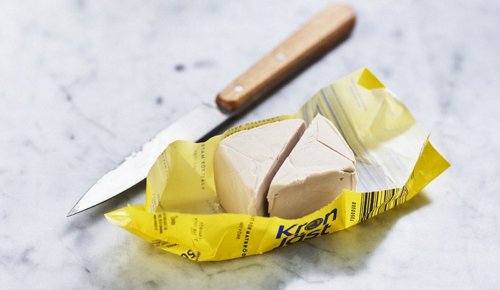
Note that you obviously don’t need the fancy Swedish yeast, but in the UK these days it’s hard to buy live yeast in manageable sizes - the best alternative I have locally sells me it by the kilogram! And the nice thing about Kronjäst is that most recipes want 1, 1/2, or 1/4 cube, which makes it easier to deal with.
Here’s a collection of my go to live yeast recipes should you wish to give it a try.
A few quick technical notes before we get stuck in
1: The rate your bread rises will depend on the ambient temperature of where you let it rise. In the winter you’ll find the bread rises a lot slower than it does in the summer! I wrote a lot of this blog post last winter and never posted it, so I was quite pessimistic about the rise times in places. In olden days you’d have stuck the bread in the airing-cupboard (in a UK home where the hot-water storage tank is typically), but thanks to modern insulation methods that doesn’t really help. So either you just need to add time, or you can add a little heat with a fan heater or whatever. Just know that if your rise times are faster or slower than mine, this is the most likely cause.
2: I’ve written 10g of live yeast for several of the recipes, as that is what I started with, before I decided that life was too short to keep dividing 50g cubes into 5 bits using a scale when 4 bits by eye-ball was a lot easier, as I wrote in the opener. I’ve left the recipes as is, as I do think 10g is a good starting point, but don’t fear it needing to be spot on, as these days I use 12.5g instead, and get good results (and indeed a slightly faster rise time again). Just note you should adjust the salt to match.
3: Where I say “warm water” I mean water that is just under 40 degrees Celsius or 104 degrees Fahrenheit. Anything warmer than that and you’ll kill off the yeast. If you don’t have a kitchen thermometer then I can highly recommend one - they don’t cost much for a basic unit, and they take a lot of the guess work out of cooking (is this meat/fish cooked through? is this water going to kill my yeast? is this soup ready to serve?).
Basic white loaf
When I started making bread again I simply started by substituting live yeast for the dried yeast of the recipe I’d always made, which was one from Jamie Oliver’s first book, learned back when I was a student. In this instead of adding x grams of dried yeast I’d add y grams of live yeast and leave everything else the same. This works, but I discovered over time that if you’re using live yeast you don’t need to do all the encouragement you need to do to get the dried yeast going: no need to soak it for 15 minutes in water, and no need to feed it sugar to encourage it to wake up (this realisation came from this video by Swedish youtuber Matgeek who made some bread rolls without adding any sugar, and is another good recipe to try).
Not adding sugar appeals to the minimalist in me: I like that I can make bread with one fewer ingredient and get a great loaf. But I will say that if you do add sugar the bread will rise faster as your yeast is presumably running around like a small child full of candy. Not adding sugar also does change the taste - in a subtle way, but it is noticeable, so it’ll be down to your preference if you want to add a little sugar or not.
I picked up some other tips that helped improve my loaf from a colleage at work, Daniel, who’s done quite a bit of bread making training. His two tips that I have since taken to heart: sift your flour (i.e., pour it through sieve before using it to make sure it’s finely spread), and put the salt around the edge of your flour before you start mixing rather than mixing it in immediately. I’d guess the last one helps the yeast get started: you add salt to kill off the yeast, so I imagine if you work the yeast into the flour first then you delay this a little and get a better rise.
So, whilst I still follow Jamie Oliver’s technique, the recipe I use is now a mix of all these influences, and I’m really happy with the repeatable results it gives me.
To make one loaf I use:
- 500 g strong white bread flour
- 300 g of warm water
- 10 g of live yeast
- 10 g salt
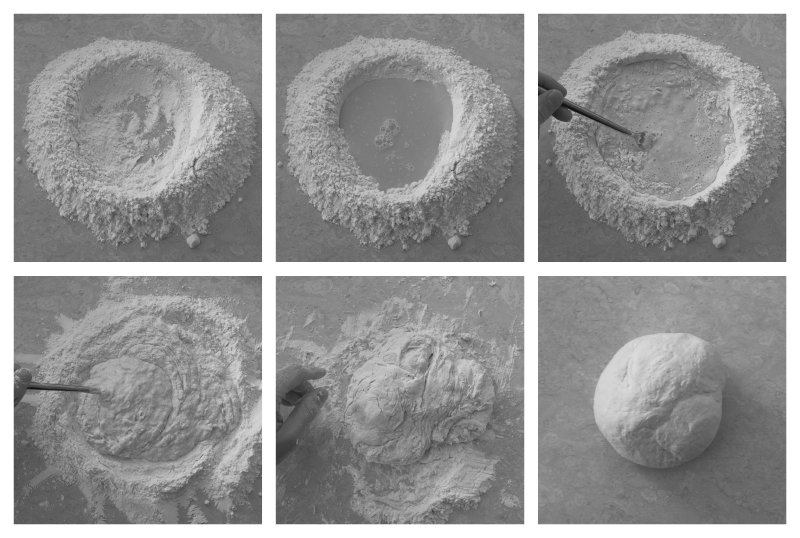
First I sift out the flour into a pile on work-surface, crumble on my live yeast, and then make a well in the middle. On the inside of this well I’ll put the water (you might find it easier to add half the water at first, then add the rest as you work in the first lot), and around the outside edge I’ll pour my salt. Then, using a fork, I’ll slowly work the flour into the water, being careful to not try create a flood :) At some point, once all the liquid water has been absorbed into the flour and you don’t have much dry ingredients left, I’ll switch to using my hands and kneed the dough for about ten minutes. We do have a stand mixer, but for bread I like to do it by hand and this constitutes about 100% of my upper body workout for the week.
If I find the dough is a little sticky I’ll add a little sprinkle more of flour, and if it’s too dry then I can sprinkle on some more water - but I do so in tiny amounts each time. After making many loaves I eventually found the 500 g flour/300 g water ratio works for me, but it will vary depending on your flour, so don’t take the above as gospel: if you find you’re regularly having to add more of one just update the recipe over time!
Once I have my dough I’ll lightly flour a deep bowl, place the dough in, and then flour over the dough (you’re just trying to stop the dough sticking too much here), and then I’ll cover the bowl with a clean tea-towel and place it in a warmish part of the house for an hour or so until it “roughly doubles” in size. I use quotes there as I hate that description, as I’m fairly sure guessing volumetric doubling is quite hard (do they mean double in volume? double in width? and see all discussions about why pie charts are bad) but you just want to see that the yeast has activated and your bread is starting to expand reasonably. If you’ve added sugar then you probably only need to leave it 40 minutes or so. If your house is cold (it is winter as I write this) then you may need to leave it longer.
Whilst the bread is rising, I’ll get my loaf tin, a 2 lb one, and I’ll lightly grease the sides with butter and also give it a light sprinkle of flour to make it easy to remove the loaf once baked.
Once your bread has risen for an hour or so, then take it back to the work-surface and then you want to kneed it for another minute or so to knock the bubbles out of it. Almost all descriptions of bread making will say “knock the air out of it”, but it’s not air - it’s carbon dioxide generated by the yeast as it eats, so I’ll just say knock the bubbles out of it. Once it’s back to it’s original size, you want to make it into a nice oblong shape so as to fit into your tin. I will tend to try to tug the sides of the dough to the bottom so as to give a nice smooth top, but that’s not really necessary - just try and make it fit roughly into your loaf tin all the way along. At this point I’ll also take a sharp knife and score lightly the top of the load along its length, which seems to help the load rise. This done, I then dust it again with flour, cover it with my clean tea-towel, and put it back for a similar time as before to rise.
At this point pre-heat your oven to Gas Mark 8, 232 degrees Celsius, or 450 degrees Fahrenheit. You can also reflect at this point about how both these last two temperature units have unusual capitalization rules.
Judging when the second rise is done is a little easier: I tend to wait until it just starts putting its head above the sides of my loaf tin (this is why you want a clean tea-towel).
At this point pop it into the oven for about 20 minutes, along with a handful of ice in the bottom of your oven. I have see others put a pan/oven-proof dish of water on the bottom shelf also. This helps the crust of your bread crisp.
My most common failure in making bread has been not letting it cook long enough as it looks done on top, but when I slice it close to the middle I found the bread still a bit doughy. Lots of books will talk about tapping the bottom of your loaf to make sure it sounds hollow (though it clearly isn’t hollow, right?) which is another description I hate. What you’re looking for is the middle of the bread to have reached roughly 90 degrees Celsius or 190 degrees Fahrenheit; again, if you don’t have a kitchen food thermometer I can’t recommend one enough as the proper way to tell when all kinds of foods have actually cooked. Measure twice, cook once, as the saying goes.
Once you’re happy the bread is baked, take it out from the oven and turn the loaf out onto a wire rack and leave it to cool for ten to fifteen minutes. It’s tempting to tear into it immediately, but it’ll still be doing some cooking whilst it cools, and I find it’s important to let the loaf rest a while to avoid doughy middles.
And that’s quite a lot of text for what is actually quite a simple recipe :)
Basic wholemeal loaf
Whilst I love white bread, I know that wholemeal is better for me, so I reserve white bread for when we have something to go with it, and this is my regular recipe. The basic premise of this recipe is just that you need more water when working with wholemeal flour: whilst white flour will want about a 60% hydration ratio, wholemeal wants that to be more like 70%. So that means I’m using:
- 500 g strong wholemeal bread flour
- 350 g of warm water
- 10 g of live yeast
- 10 g salt
The dough is slightly more sticky to work with, but I think that if I made it any drier then the consistency of the final loaf would not be as nice. The other major thing you need to change with wholemeal is patience! I effectively let the bread rise for two hours each time, so gone is the idea what I’ll start a loaf at breakfast time and have it for lunch with my wholemeal - it’s make it the day before (though I probably might have a slice, just for science, on the day :).
Otherwise I do the same as above. If four hours of rising time is too long for you, then you could try adding in 10g of sugar into the water to feed the yeast, or you could go for a mix of wholemeal and white flour - just make sure you scale the water content proportionally (e.g., half and half would want a hydration of 65%).
Pizza
For the longest time we’ve made pizza at home using pre-made dough balls, which we freeze when we get them so keep forever (well, given how frequently we eat pizza, as long as they ever get). I used to make my own pizza dough bases back when I was first learning bread in my student days, but the dough was never very pizzay, so I stopped in preference of first pre-made bases, and then pre-made dough balls (on the grounds that dough balls take up less room in the freezer!). But with the discovery of live yeast I wanted to see if I could do better. The answer was yes, I could do way better.
It took me a few attempts, but in the end I found this tutorial by Städler Made, which works really well:
The tl;dr is that you use hardly any yeast at all, just 0.5 g when I’m making pizza for two, and you instead have a long rise time (8 hours total). I was skeptical that you’d get much rise from so little yeast, but it really does work. 8 hours is quite a long time, but if you think to get the dough started before lunch, you’ll be ready to have pizza for dinner.
The other indication that Mr Städler is onto something is that the dough is wonderfully stretchy, and so you can shape it by hand quite easily, so no more rolling pins and pizzas coming out the shape of underpants!
They even have an online calculator to help you get the ratios right (and again, no sugar used, so it meets my minimalist dough requirements).
If you’re looking for a tomato sauce recipe for your pizza, then my go to is also super minimal: just plum tomatoes, a little salt, and some olive oil, following this recipe from Angry Cupboard Man, Joshua Wiseman. Add fresh mozzarella to that, and you’re in for a good pizza experience.
Semla
We’ve covered savoury, how about something sweet?
Freshly made Semlor may be one of the most amazing things I’ve ever tasted. There’s a lot going on in this recipe, but I really can’t encourage you enough to try these. (For those wondering about the spelling, it’s Swedish grammar: Semla is singular, and Semlor is plural).
A Semla is a cream topped bun that they have in Sweden for Lent. I first came across it in a video game, and then last year we found some in London, but this year we had to make our own. We went for a combination of two recipes. Firstly, we took the dough and cream from the recipe provided by The Scandi Kitchen, and then we took our paste filling recipe from Matgeek. At some point I’ll try Matgeek’s bun recipe too, but it takes longer to rise and we cooked these as part of a team zoom baking thing we do semi-regularly, and the shorter rise time suited us.
So, follow the above linked recipe for the buns, and the instructions there are quite clear so I won’t repeat them here. We used cardamom pods that we ground in a pestle and mortar, and don’t worry about making the cardamom particularly fine: we ended up with bits the size of poppy seeds and they added a nice texture to the bun in addition to their lovely flavour.
Once you’ve made the buns, let them complete cool, and then switch to Matgeek’s recipe, which to me gives a more traditional filling (based on a limited sample and lots of youtube watching). Given his recipe is in Swedish I’ll drop the translation for this here, and I assume you made 12 buns from the Scandi Kitchen recipe.
Firstly, take your cooled buns and cut off the cap. You can do this as a circle, or another tradition is to cut a triangle. Remove any bun insides from the cap and put them in a bowl, and scoop out some of the bun too and put that into the bowl also - you’ll use these as part of the filling.
The rest of the ingredients for the filling are:
- 100g of marzipan or almond paste
- A dash of vanilla (we used fancy extract, but obviously you could use the beans from a pod if you have one)
- A splash of milk to help make a paste
From the marzipan into the bowl with the bits of bun you scooped out, add the vanila and small dash of milk and start mixing until you have a pliable paste. If you add too much milk it’ll be too runny, so just start with a small amount and add until you have something you can squish but isn’t runny. Take this and fill the whole you made in the buns.
Next, get some double cream and whip it until stiff. In an ideal world you’d pipe this on top, but we again just spooned this on top of the paste instead. Now add back the cap, and sprinkle with a little icing sugar, and now you’re ready to tuck into your Semla!
If you think that is fiddly, then just know with suitable powertools you can fill 160 Semlor in size minutes :)
Babka
The first thing I learned to make of this form was Babka, which I’d had once previously and enjoyed, and then we found this recipe from Binging with Babish, and I recommend this.

I’m not going to list the steps here, I just follow his to the letter pretty much:
But a couple of pointers:
Firstly, you can absolutely make this by hand without a stand mixer, but you need to be prepared for a sticky workout. The first time I made this was before we got a stand-mixer, and so I did it by hand and it came out wonderfully, so don’t be put off. Kneading any cake like bread dough with eggs and/or butter in is always very sticky, so you need to be ready for that, and for this one in particular working the butter into the dough in the final stages of his recipe requires a lot of manual labour. Now that we have a stand-mixer, I’ll make it in a stand-mixer as it definitely is easier, but don’t let the lack of one stop you making this if you don’t have one!
Also, on this topic, with the stand-mixer just don’t aim for a break-like stickiness to the dough like I did the first time: this is a cake batter so should stickier than that. The first time I made it in the stand mixer I ended up adding too much flour chasing a bread-like consistency and having a quite dry babka as a result.
Secondly, when you make the filling for the cinnamon version (which, I confess, is the only version I have tried (multiple times)), you want to make sure it’s still warm enough to be runny when you apply it to the rolled out dough. The dough has been in the fridge overnight at this point, and so the butter-based filling will set very quickly if it’s not warm enough, and become unworkable. Also apply it in little amounts, don’t just dollop on the filling and then spread it out. I’ve made both these mistakes and you end up with a very patchy filling; this isn’t the end of the world, but it will mean your swirls won’t be as pretty as the might otherwise be.
Finally, and this may be a peculiarity of our oven, I found that to make sure the bottom is properly cooked by the time the top starts “crisping” (aka, burning), it helped to put a pizza stone in the oven and bake on that. It’s not essential, I’ve made successful babka without it, but depending on your loaf tin this might just help ensure that the bottom of the babka isn’t still doughy when you start to worry about the top getting over cooked.
Honourable mentions
There’s lots there, but a couple of others that I can recommend if you get into making bready treats:
-
If you want another Swedish bread-like treat, well they have no shortage of such things, with a significant number of calendar days dedicated to specific cakes. As a follow on to Semlor I can also heartily recommend Lussekatter, a Saffron based bun that they make in the run up to Christmas.
-
Keeping with Saffron, I can also recommend Sally Lunn buns, as taught, along with their history, by Max Miller in Tasting History. These come out like a Brioche bun, but more yellow. Just don’t skimp on the Saffron: I found the “few strands” Mr Miller describes here as not enough to give a significant flavour/colour shift.
- Next: Raynaud's Syndrome tactics
- Previous: Lightening the load
- Tags: baking, bread, swedish