Finding the photos you took but didn't realise
Having just acquired a camera famed for its applicability to urban and street photography, we are all asked to stay at home – my timing is great as always. Obviously you can take a lot of pictures at home – I certainly did during my 365 project where having some white card to use as a backdrop for random household items proved invaluable – I don’t really feel like doing that right now. Instead, I’ve decided to go back through all my old photos and try to improve my basic editing skills.
In the last few years Laura and I were fortunate to go on a series of road trips through parts of the US, and some city trips to Nantes in France, and Helsinki in Finland. During these trips I took a lot of photos but published very few of them. In part this was because I’m not a fan of Lightroom, and so dreaded processing them, but also because I found a lot of the pictures didn’t match the scene as I felt it emotionally or remembered it after. Now, no amount of editing will make up for bad composition, of which there is a fair amount in my library, but even where I felt I got the composition right, the photos didn’t convey how the scene felt, and it’s these photos that I’ve been going back to try and see if I can improve, to expose some hidden gems.
The kind of things I’m looking to adjust are exposure, contrast, colour temperature and balance, that sort of thing. In terms of pixel editing, the most I’m doing here is cropping or straightening, but ideally I’ll have got that right in camera. Basically, I’m just doing the things that you could have done in a dark room – if you’ve not read it I can recommend this old article about how famous film prints had their exposure tweaked across the picture.
My tool for this is Lightroom, and as such I’ve been watching a lot of videos about how to edit photos of various styles. Whilst some of these videos do go into the “swapping the sky for a better one”, or even into “please buy my Lightroom presets”, I’ve learned something from each one despite not all of it being appropriate for me (or the presenter’s bombastic style not being to my tastes :). Here’s a few that I can recommend if you’d like to getting started in this too:
- How I edit color by Faizal Westcott
- Find your creative style with split toning by Mark Denney
- Lightroom editing tutorial by Joe Allam
- How I edit my photos by Paul McKinnon
As I continue to watch these videos and expand my knowledge of what I can do, and just get practice in so I develop an intuition for what works and what doesn’t, I’ve been posting to my Flickr account a picture every day or so from my backlog.
The other restriction I’ve given myself is that in general I will just use a limited set of colour profiles. Given these are all older pictures, I’ve kept it to Color Chrome and Monochrome+Y on pictures taken with my old Fujifilm X-E2, and a similarly restrictive set of Adobe colour profiles that look similar for those taken with my Canon 7D. The reason for this is to force me to do the editing, rather than letting the colour profile change a lot of things without my understanding why.
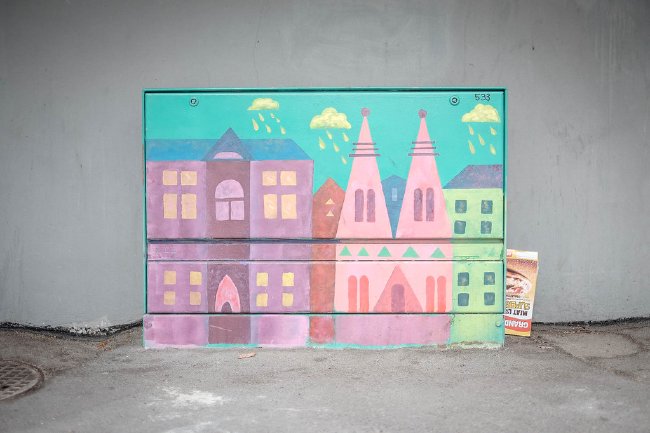
This below picture, of a painted street box in Helsinki, is one of the first ones where I managed to get the photo to convey what I saw rather than what came straight out of camera:
The day was quite overcast at that point if I remember correctly, and so the picture came out of camera with a very flat look. For this one I tightened up the crop a little, upped the overall exposure, then gave it an S-shape on the tone curve to provide slightly more contrast. I also used the clarity slider, which adjusts contrast in the mid-tones for the image to further bring out the detail in the neutral background.
One thing I didn’t change, and as a rule don’t, is colour saturation. Its very easy to overdo that, and I find that adjusting the light and dark to make a photo pop results in an image more to my tastes.
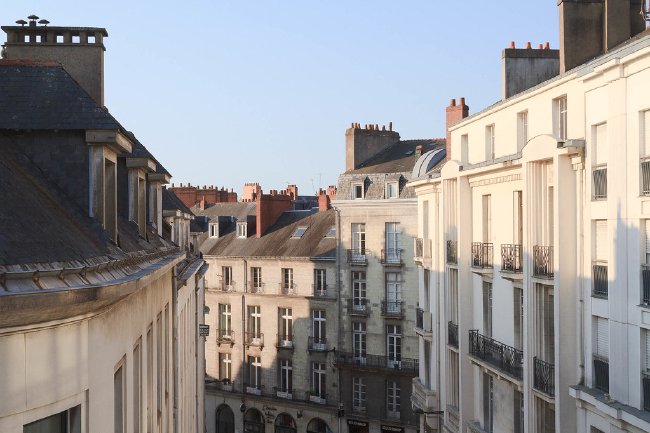
This photo was taken from a hotel window in Nantes, and was me just trying to capture the cityscape a little:
The sun at this point was just coming up, and out of the camera I’d lost all the detail in the street, due to the high contrast of the light itself. So here I had to do the opposite of the previous picture and remove contrast rather than add it back. I also tweaked the colour temperature to bring back the warmth of the scene which had been lost as the camera made everything look more white than yellow. The result much better captures my emotional memory of the light of Nantes in the morning than the series of bits that were saved to the flash card.
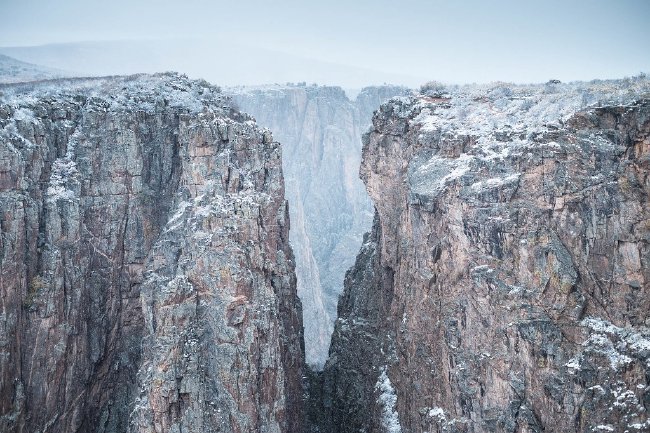
This final example is one I’m quite frankly amazed is one of my pictures at all – this is something I have no right to have taken:
This is taken in the Black Canyon of Gunnison National Park in Colorado. At the time there was a crazy snow storm that had swept in: the previous day we were having to buy hats to keep the sun from burning us, and the following morning it was a white out. I took this picture of the break in the rocks, but out of camera it looked very dull, as the diffused light caused everything to come out looking flat.
Interestingly it really didn’t take much to make this pop, which is the real learning for me here – I went from a dull looking picture to one I’m proud of very quickly. I upped the exposure at the top end of the tone curve to brighten up the whites – which is how I remember the scene in that snow storm, and to separate the foreground rocks from the background. I also again adjusted the clarity just a little to bring out the features of the rocks to be a little more distinct. And then finally what got me to me memory was adjusting the colour temperature down, the opposite of what I did on the last photo, to capture that slightly colder look. And bam, it turned out that one of my favourite photos I’ve ever taken was sat in my photo library for the last two years and I didn’t know it.
Thus, if you’re stuck at home wishing you could be out taking pictures, perhaps instead go back and see if there’s any hidden gems in your photo library that just happened to escape your attention at the time.
- Next: Focal lengths, part deux
- Previous: Recording light again
- Tags: Photography


